Friday, February 24, 2012

Turn a blah picture into a WOW picture

So last weekend I walking the streets in downtown Mt Shasta. I walked into a store called Pomodoro. Cute store! They had these gorgeous floral canvas prints I LOVED, and the main reason I loved it was because the sides of the canvas were covered in burlap and nail heads! LOVE! So I thought to myself, I've had a floral canvas print (One I didn't love but bought it because it was only 9.99 at Ikea 5 years ago), and I wanted to add this "one of a kind" detail to my picture. Maybe then I could fall back in love with my picture and I wouldn't want to take it to the local consignment shop!lol! I love it so much now, I want to wrap everything in burlap and nail heads. So easy and cheap to do.

So here it goes...


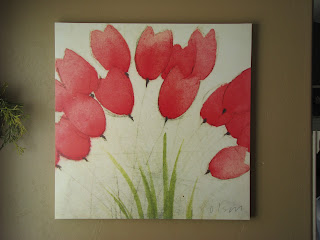
Here is my print before


(Side profile view of canvas before)


First I took a yard stick to measure the length so I knew how long to cut my burlap strips. I cut them a little longer so I could wrap them around the edges. Then I took a yard stick and measured the width on the sides of the canvas.


Next I measured out my burlap to the correct length and width, then cut my strips out...there should be 4 total :)


After my strips are cut, I hot glue the first strip to the side of canvas. All you need is a bead of hot glue on the outer edges of canvas. It helps secure it down better.


The first strip of burlap should look like this.

The next step was a little more difficult for me because I couldn't figure out the mathematical spacing for the nail heads. After arguing with my husband (oh come on you know you do too :) I just decided I'd do it "Rachel" style and eye ball it. So you can do it either way.

Next I started nailing the nail heads. (Found them at local craft store.)

(sorry I didn't take more pics of the nail heads but I continued this around all 4 sides)

Drumroll please!!!!!!!!!!


I absolutely LOVE my picture now! It reflects more of me and I'm so happy about it. I have a couple of pieces I want to do next!! Have a great weekend everyone!

Rachel
Sunday, February 19, 2012

Make your OWN headband holder

For my first blog entry I wanted to help you create your own Headband Holder. Its so simple and quick you won't believe it. I created this one using an old baby formula canister. You can also use an oatmeal canister or anything cylinder shape. All you need to get started is:

~ Mod Podge (Love this stuff)
~Paint Brush
~Formula or Oatmeal canister
~Scrapbook paper (I used 2 different ones)


So, first I ripped pieces of paper in all different shapes and sizes. Remember gals, it doesn't have to be perfect! :) 


 Next take your paintbrush and coat the can in mod podge. Apply liberally.


Next apply the pieces of paper in random order all over the canister. The funkier the better. Smooth out with your fingers so paper is flesh with canister.


Next trace bottom of canister with paper to cover the top with.


When finished applying pieces of paper, allow it to dry for 30 min. When 30 minutes is up, cover pieces of paper in mod podge until the canister is completely decoupaged.( It should look like this after its covered in mod podge.)


 After it was all dry, I found an old shabby chic candle holder that I've had stashed away under my bed. I though it'd be so cute to hot glue canister to. You can also add to an old candlestick holder, cake plate holder, or nothing at all. Its all up to you :)


 Voila! Isn't this so cute!! You can also use the top for your cute little clippies! The other plus is that its freed up a drawer in my bathroom. You can never go wrong with that! :) Happy Sunday and God Bless!


Rachel